Showing posts with label DIY. Show all posts

Monday, September 3, 2012

Halloween Apothecary Jars Tutorial

Bubble, bubble, toil and trouble (for my husband because I think these will be staying out all year)

I will be the first to admit that I'm the Queen of Frugality.  I like using or repurposing things that I have lying around the house to make new things and I'm the first to collect junk that others are tossing out in the trash.  How did this happen? One word: Pinterest.  That time-sucking, awe-inspiring website has spurred me into so many (unfinished) projects that I can barely keep my head straight.

My latest project?  Apothecary jars for Halloween.  I was inspired by a post that I found on Pinterest.  It offered some really great ideas on how to make your own jars, but you had to buy the labels from her store.  I like to challenge myself to see how many things from my house I can use to do my crafts, so I used my Open Office Writer program, a font that I found, and the lovely Google search tool to come up with some really great labels (which I am not including because I don't want to take profits from the woman that inspired this project. Go to her Etsy store and buy hers designs if you don't think you can make them. She has many beautiful items for sale).

All I did to make the labels was download the font (on my FREE Open Office Writer program), Google search "vintage frames" and right click and save the ones that I wanted, add some text boxes with the words to the center of the frame (again using Open Office Writer) and print them out. I know you can do this with Word, also, but I honestly have no idea how.  I also used a website to get the wording for some of the spells on the labels. I'm pretty sure most of the spells on that site are made up by teenage girls with too much time on their hands, so the jars should be pretty safe to make without worrying about really cursing someone.

After printing the labels, I wanted an aged look to the white paper. To remedy this, I whipped up a cup of instant coffee, soaked some up with a paper towel and blotted the label paper with it. After it dried, I cut out the labels and glued them on to the jars.  In hindsight, I wish I would have let them dry and repeated the process because they were quite as brown as I wanted them to be.  After the glue dried, I went over them with some decopage glue (homemade, of course) so I could set them outside for decor and not have to worry about them getting wet.

To make the paper toppers for the jars, I just crumpled up some coffee filters (one for each jar) and stuffed them into the coffee that I had leftover from making the labels.  I let them soak for a minute, then removed them and let them dry in the sun.  I'll talk about attaching them after the individual jar tutorials. 

Anywho, after I got all of that figured out, I finally got to the fun part (okay, I'm lame. Making the labels was just as fun for me).  I had to decide what I wanted to stuff in my jars.  My goal was to use the least amount of purchased materials as possible.  To get the jars, I raided the fridge and used some old canning jars that my aunt had given to me.  I also know that some friends that made the same project posted a request for jars in their Freecycle groups and got a TON of responses.

To get the materials for inside, I raided the entire house: the craft closet, my kids' bedrooms, the garden that was overgrown with weeds.  Anywhere I thought I could find anything to stuff in a jar, I went there.

So how did I make out?  With the exception of buying a cantaloupe (which we eat anyway), I didn't spend a penny.  I was surprised at the amount of stuff I had lying around that could be used to do this project.  Shredded black felt for the bat wool, weeds from the garden for Dragon's Breath and old silk flowers for the Love Spell.  It all came together nicely and the jars look great.  Below are some pictures and the instructions for the way I made my jars.  With minimal money and effort, anyone can easily add these to their Halloween decor! (Definitely my kind of project)


DRAGON'S BREATH

"Fire in the air, fire on the ground. I use the fire that cannot be found. It comes out of my mouth in a blow. To people around me, my fire will show.  (Cheesy, but whatever).
I went the nature route since I imagine that not many dragon's lived in captivity.
 To do the Dragon's Breath, I relied heavily on my overgrown garden.  I snipped off some kind of wispy weed that kind of reminded me of corn, dried black seed pods from velvet weed, a few miniature pine cones and a leaf or two. I figured the wispy things were green (like a dragon) and the spiny parts of black seed pods were just kind of neat.  It turned out better than I could have hoped. 


WOOL OF BAT

My husband asked if we could shear bats to make sweaters.


This was one of the original ideas that I got from the site I mentioned above.  The original poster used feathers (real or fake, I don't know), removed them from the shaft and "fluffed" them to make them look like bat wool.  Well, I didn't have any feathers and I'm not much of a nature girl, so I spent a little time rummaging through my craft closet until I found a square of black felt.  I talked my oldest son into helping me pull it and shred it until we had a nice looking jar of bat wool.


TRUTH SERUM

"For ye who asks, the truth revealed. Open hearts, secrets revealed" (Kind wish I would have gone with "secrets spilled")
Have fun tricking anyone into drinking this muck
I had no clue what to do with this one.  I had seen a suggestion to use pancake syrup, but I was worried about it leaking while it was being stored.  My son suggested mixing some kind of greenish/brown concoction that would look like slime.  I wound up mixing brown sugar (yes, I know, still sticky), water and two drops of green food coloring.  There is a nice hint of brown that you can't see in the picture that gives it the look of some kind of sewer water.  Gross, but I guess that is what we were going for. 


WITCH'S BREW

Type O+, Extra Clotted

I'm not sure if witches drink blood, but that is the route that I went.  We had a bottle of fake blood from a previous Halloween that the kids kept using to make giant messes, so I figured I would dump it in here to get it out of their reach forever.  To give the illusion of clots, I plopped a few globs of Vaseline in there.  I would have used plain gelatin instead, but I didn't have any on hand.  The Vaseline definitely gave it a clumpy look, but I couldn't really get it to show up in the picture. 


EAR OF TROLL

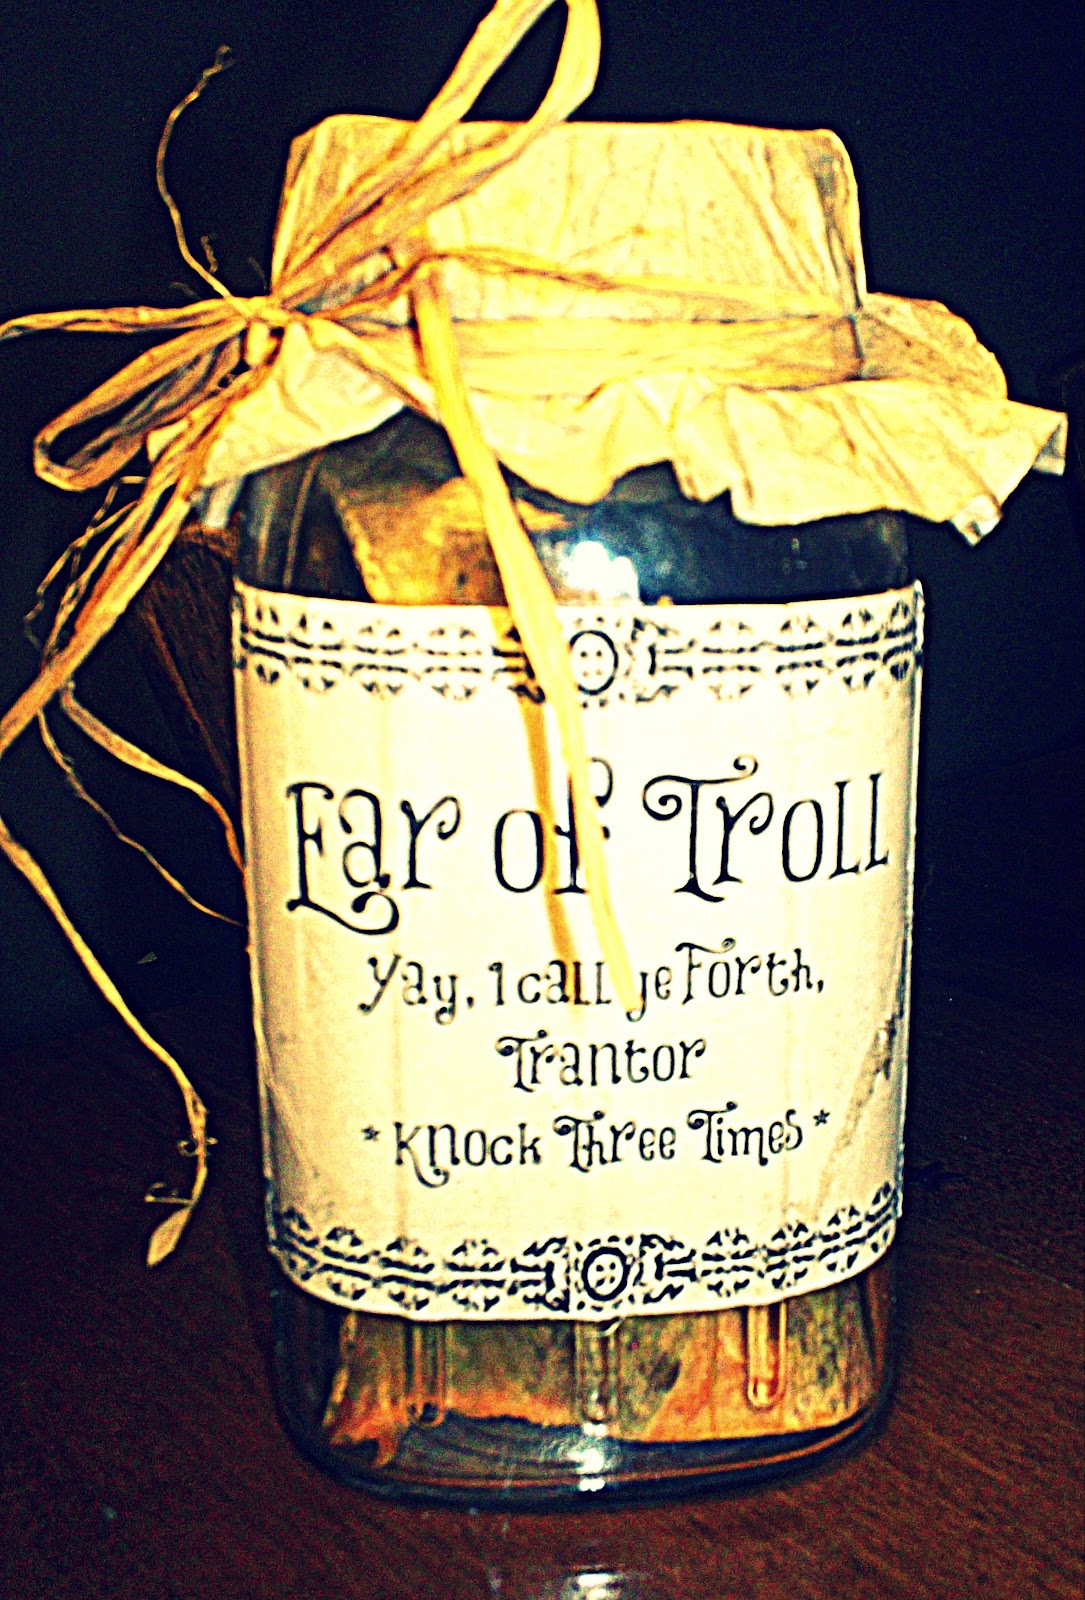
"Yay, I call ye forth, Trantor!" (I love Ernest Scared Stupid. One of my favorite Halloween movies)
I wonder how badly this would smell if I opened it after Halloween?

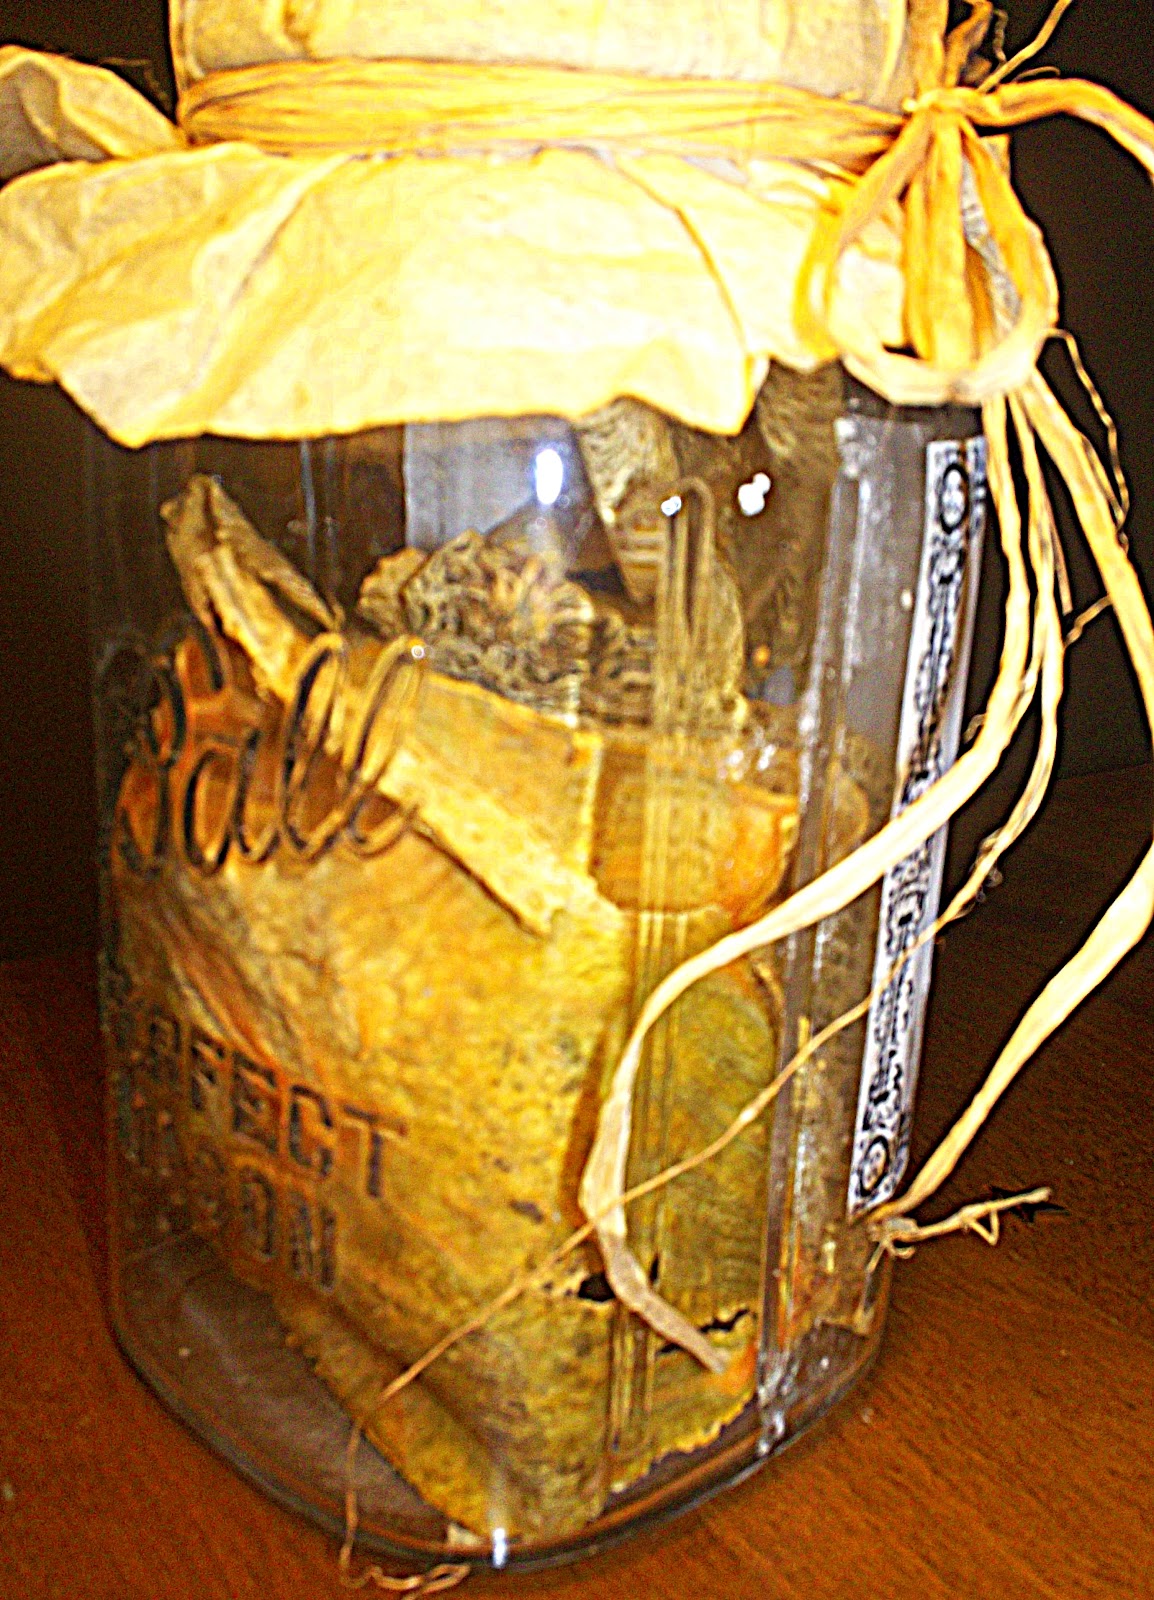
This was one of my favorites.  The original post with the labels for sale suggested using a cantaloupe skin that had been sitting in a compost heap for a while.  Since we haven't opened our compost bin in a month or so, and I could see a nice stream of liquid flowing out weekend before last, I decided to dry my own.  I bought a cantaloupe from Giant (on sale for $1.49), cut it in half and then cut each half into quarters so they resembled ears.  After I scooped out all of the flesh, I baked them on a cookie sheet at 250 degrees for about 2 hours.  They weren't quite dry, but the little bit of remaining flesh was easy to peel out.  I peeled it as good as I possibly could and then popped them back in for another hour.  They were pretty crunchy and "ear-like" by the time they were done. 

Another suggestion on the original post was to use orange or avocado skins that have been dried.  That may be easier than using a cantaloupe skin, but WOW these things look creepy!


LOVE SPELL

"Let the on that drinks this wine shower me with a love divine. Sweet love potion no. 9, make this love forever mine." *Must be sealed with a kiss*
I used the Victoria's Secret Love Spell be my inspiration for this one

I also loved making this one.  I found the spell on the website mentioned above and added it to the label.  Since the only thing I could not find in my entire house was glitter, I wound up using a tube of purple glitter glue that I found at the bottom of my daughter's toy box and some silver glittery fabric paint to get the shimmer that I needed.  I added them to a bowl (or you could just add the glitter that every other family has lying around) and mixed it with enough water to fill the jar.  I added some purple gel food coloring from the neon collection and whisked it until it got to the color that I wanted (it was a little milky since the glitter fabric paint had some opaqueness in it).  I then snipped petals from old silk flowers I had leftover from a garden party hat project, dug up some confetti I bought for another project and pulled a few strands of silver tinsel out of the Christmas craft bin and put them in the jar.  I poured the purple glitter water over the stuff in the jar, shook it up and VIOLA! I had the perfect love spell. 


HEX NO. 23

With this knot, to me you're tied
And Only for me shall you grow.
Another's bed you will never lay
Stray you shall never go.
If a vixen tempts your truth
And you decide to roam
Limp and flaccid you shall be
Until you come back home.
The lucky guy that's been cursed to have a non-working man part.
This stick was meant to resemble a you-know-what. Tee hee.
I made this one out of the blue after finding an "impotence spell" on the spell website.  It was an awful rhyme that I rewrote to be not quite as awful.  Hopefully people will get a chuckle.  I tried to go with something phallic to resemble the item being binded in the spell.  I wrapped a stick with black felt, red ribbon and a branch from a briar bush.  I also tied a lock of hair (cut from an old doll) into the bunch.  I added a set of old cufflinks to an organza bag I received as a wedding favor, a printed picture of the "couple" (that I found randomly in a Google search) and some plants (a butterfly bush clipping and some spiky holly leaves).  I guess that is all of the ingredients needed to keep a penis from ever rising again. 


EYE OF NEWT

BEFORE the oil spill

This one was by far the easiest (or so I thought).  I threw some coriander and black peppercorns into a jar, sprinkled them with paprika and poured in some canola oil.  Shake and that's pretty much it.  The paprika clung to the bottom and made it look like it had been sitting for a while and it also changed the color of the oil to a murky brownish/yellow.  Thinking that I would prevent leaks, I attempted to glue the jar lid shut with a hot glue gun.  DO NOT FREAKING DO TRY THAT!  I wound up screwing up the track for the lid and it leaks all over if it is tilted.  Maybe you can try regular craft glue or something, but DO NOT hot glue it.  Looks like this one is now a permanent decoration in our house because I am terrified to put it in storage. 


MERMAID HAIR

Ocean Goddesses, Far and Near
Listen Now, Please Lend Me Your Ear
   My Wish is Simple As You Will See:
      To Become a Mermaid of the Sea
I hope you have a lot of freaking yarn or a smaller jar
This was another that was inspired by the original post.  Instead of using twine, I used a very brightly colored, tie-dyed yarn that I had leftover from another project.  My step-daughter and I pulled it apart into little frays and tossed it in the jar.  I figured that mermaids might have pretty multi-colored hair to match their tails so it worked well.  We threw in a couple of seashells that we had leftover from a beach excursion and called it a day.  I might suggest filling the bottom quarter to half of the jar with sand because we used A LOT of yarn to fill this jar (a quart canning jar). It kept settling and we would have to add more.  It has even settled more since we first made it so I think I will open it and add some sand before next Halloween.


NIGHTMARE DUST

The first jar I made.  Can you tell or what?
WARNING:
Do Not Open Until
After Darkness Sets!
I'll start off by saying that I am not completely happy with how this one turned out and I think I may redo it.  It was my first one and I was sort of feeling my way through the project at this time.  To do it, I took baking soda and dyed it with purple food coloring.  I then took Epson salt (since glitter is non-existent around here) and dusted the inside of a smoked out candle jar with it.  I poured the purple stuff in and called it a day.  I was hoping that the salt would look like sugar, but it wound up absorbing the purple food coloring and it just looks crusty on the inside of the jar.  I am thinking some kind of black lead dust (or crushed up black chalk), glitter (once I decided to break down and spring for the $2.49 pack at Walmart) and a few of the silver confetti stars I have leftover would look much more like something used to conjure up a nightmare or two.  We'll see how much more I feel like doing before Halloween. 

So that is all of them. With the exception of the Nightmare Dust, I am very happy with the way that they turned out.  They even gave me some family quality time in that my kids were actually enthusiastic about helping me make the stuffing of a few of them.   I hope that after reading, you decide to make some of your own.  They are cheap (my total cost was $1.49 for the cantaloupe since I recycled and repurposed everything else), they are easy and they look really great sitting around for Halloween.  Use them as part of a centerpiece for a costume party, use them to spookify a bookshelf or sit them outside next to a cauldron.  But don't be surprised at the amount of people that stop to ogle your goodies and give you compliments.

Now, as promised, I will explain the paper toppers.  After the coffee filters dried, I spread some hot glue on the top of the jar lids and stuck the topper on it.  I pressed it down with a pot holder (since it is called hot glue and you can really feel it through the thin little coffee filter) and held for a few seconds until it was set.  I then took a rubber band and put it over the lid so it rested under the lip of the jar lid.  I used raffia (that I rescued from the neighbor's junk pile during spring cleaning) to make ties around the rubber band to hide it.  I doubled it on some, made bows or just knotted it.  You can use twine or ribbon or even long weeds that you find in your overgrown garden.  The possibilities are endless. 

I hope you enjoyed the ideas and you are inspired to make your own Halloween apothecary jars!  

I also recycled some cocktail mixer jars and added them to my display.
I threw in the skeleton bride and groom that topped our wedding cake because I couldn't bear to put it away until after Halloween.

The little stone tart warmer on the right of the picture?  I found that next to the raffia that my neighbor gave me on clean-up day. 
The entire collection...so far.

Tuesday, February 28, 2012

DIY: Warm Cocoa Vanilla Brown Sugar Body Scrub

Like most of us, I have been sucked into Pinterest. Usually, I just sit around pinning various ideas for things that I am going to do "someday." Well my friends, TODAY is that day!

I originally found this idea through Bath.Body.DIY and I decided it seemed easy enough for my first attempt at homemade spa products (plus I had everything that I needed to make it).

After about 10 minutes I had the finished product and I must say, it scrubs like the expensive stuff that you buy in the stores and the smell is FANTASTIC. I even went out on a limb and added some cocoa (which is rich in the antioxidants in the flavanol family) for some bonus skin pampering.

So here it is...my recipe for Warm Cocoa Vanilla Brown Sugar Body Scrub!

What you'll need:
  • 1 1/4 cup brown sugar
  • 1/2 c coconut oil
  • 1/4 cup cocoa powder (the unsweetened baking kind)
  • 10 drops vanilla essential oil (I used roughly 1/2 teaspoon)
  • Glass jar with lid (for storing)
Yes, it's vanilla extract in the picture. I realized that I had the wrong ingredient when I re-read the instructions.

 Step One: 
Measure out 1 1/4 cups brown sugar and dump into medium mixing bowl. You may all point and laugh at my broken "1 cup" measure while you're at it.


STEP 2:
Measure out 1/2 c coconut oil. I microwave the jar (without lid) for 30 seconds so I could scoop it out with less resistance. When I got the 1/2 cup filled, I nuked it for another 30 seconds so it was in it's liquid form. Add this to your brown sugar mixture. 

STEP 3: 
Measure out your vanilla oil. 10 drops came out to roughly 1/2 teaspoon. Add this to the sugar/oil mixture.

STEP 4:
Mix it all up taking care to distribute the vanilla evenly. It will be slightly soupy when finished.

STEP 5:
Measure out your cocoa. I only used 1/8 cup (like the picture) at first but then I decided to go back and add another 1/8 cup. Viva la Chocolate!

STEP 6:
Mix it all up again and enjoy that heavenly scent!

STEP 7:
I forgot to turn my picture, but here is the finished product. It makes about half of a 32 oz salsa jar. Also, a word of warning: SCRUB MAY MAKE THE TUB SLIPPERY DUE TO THE OILS! USE WITH CAUTION!
I'm wondering how long it will take for one of my kids to ask me why I have poop in a jar in the bathroom. 

I hope you like it and decide to make your own. Please, let me know how it turns out!

Tuesday, January 3, 2012

The Grapes of Wrath

Wine. Too much f a good thing is wonderful. That is why Big Daddy and I decided to start making our own home brews. We had talking and contemplated and planned, but then I got Big Daddy for my Secret Santa at my dad's house. I had no idea what to get him so I figured I would search 'booze' on Amazon. This is when I stumbled across a product called E-Z Caps (buy the 6 caps for $14.99) that claimed they could make wine using an empty two liter soda bottle, sugar, yeast, fruit juice and their special cap. That sounded like something right up my alley (and I figured Big Daddy MIGHT like it, too, since I was shopping for him). I was totally right.

Yesterday was the day that we decided to start our first batch of wine. The concept was pretty simple:

1. Get an empty two liter soda bottle and clean it out.
2. Dump the sugar into the bottle. You can use anywhere from one to two cups depending on how sweet you want your wine to be. Sugar is also food for the yeast. The more sugar, the more food the yeast will have and the longer the wine will ferment. The longer it ferments, the more alcohol content it will have. Alcohol content is good.
3. Heat the juice until it is approximately 70 degrees. This will help dissolve the sugar and it's the prime temperature to start yeast activity. Too warm, the yeast die. Too cold, they get sleepy and lazy and don't do their job like they should.
4. Add the juice to the bottle until the bottle is about 90% full. Shake the hell out of it until the sugar is dissolved.
5. Next you'll want to add the yeast. IF YOUR JUICE IS FOAMY AFTER SHAKING, DO NOT ADD THE YEAST UNTIL IT CALMS DOWN. You can add anywhere from 1/16 to 1/8 tsp of yeast. Because we weren't really sure how much to use, we went with 1/8 tsp. DO NOT shake after adding the yeast.
6. Screw on the E-Z Cap and set the bottle somewhere warm. We chose the top shelf in Nutt's closet because it's the warmest room in the house and we want out booze ASAP.

That's about it. Do that and let it ferment for 7-14 days. If you open it after 7 days, you will have a sweeter wine with less of an alcohol content. If you wait the full 14 days, you will have a drier wine that will get you shitfaced. When it's all done fermenting, pop it in the fridge for two or three days so it can clarify and you'll have your very own homemade hooch. After that, you can strain it to get rid of the sediment in the bottom of the two liter bottle and then bottle it. I'm not sure about storing it outside of a refrigerator and I will post more on that once I've gone through the experience.

So in about and hours time, Big Daddy and I had six bottles mixed, capped and stuffed in our kid's closet. In total it cost about $15 (not including the $12 kit that you use to make over 100 liters of wine). I am very curious to see how it turns out and I will post more blogs along the way so everyone knows if these magic little caps are worth buying.

Until then, here is a little bit more info (and pictures) about the recipes and techniques that we used on each bottle:

$12 on Amazon = 6 two liters of wine. Sadly, they are no longer available on Amazon and must be ordered through the company website. Link is above. Order the 6 cap pack for $14.99.
The Apple Wine. We used 1 cup sugar, 1/8 tsp yeast and Nature's Nectar 100% Apple Juice.
When we made the Apple Wine (above), we didn't follow the instructions, per se. We added the sugar and yeast and then dumped the juice into the bottle and shook it all up. We also did not heat the juice. Oops. I'm pretty sure we probably killed the yeast and I don't know if this one is going to ferment. If we don't see anything in a few days, we will add more yeast and see what happens.

FOLLOW UP: This was the last bottle that we drank (6 in a weekend...I think we have a problem). We let it ferment for 9 days and it clarified (in the shed because there is no room in our fridge) for 3 days. It was pretty good. It was semi-sweet and sparkling but smelled kind of like rotten fruit. Nothing unbelievably special but it rocked on alcohol content (meaning it got me VERY shitfaced). So apparently, it doesn't matter if you shake the juice after you've added the yeast because it will still make a really potent wine. This may have even helped but I don't have the confidence to try it again in case it make the wine yucky. 

White Grape Peach Wine. We used 1 cup sugar, 1/8 tsp yeast and Welch's 100% White Grape Peach juice.
For the second wine, we forgot to heat the juice. We mixed the wine and sugar and then added the yeast and capped it. I think it will be okay because we put it in Nutt's closet right away and it has to be at least 70 degrees (if not a little warmer) in there.

FOLLOW UP: This is the wine that we chose to share with out family. It turned out on the sweet side and also sparkling.  I thought this was one of the dryer wines, although still sweet, that we made so it was one of my favorites. My dad enjoyed it thoroughly. Out of all of the wine, I definitely want to make this one again. We let this one ferment for 9 days and clarified it in the shed for 2 days. When we drank it, my dad made a comment that he noticed that we didn't care about all of the sediment floating in our wine. I do care (kind of) but it didn't really change the taste so whatever.

Grape Wine. We used 1 cup sugar, 1/8 tsp yeast and Nature's Nectar 100% Grape Juice w/ No Added Sugar
We remembered to heat the grape juice and followed instructions about adding the sugar. After Big Daddy shook it up, it got really foamy and frothy. He added the yeast before it calmed down and the yeast wound up sticking to the inside of the cap. After the frothing went away, the yeast was all clumped up on the top of the juice. I'm not sure if it is going to ferment so we'll keep you posted.

Berry Burst Wine. We used 1 cup sugar, 1/8 tsp yeast and Nature's Nectar Berry Burst 100% Juice.
Big Daddy was worried about how thin the Berry Burst juice looked. He also didn't know if it was too sweet to add one full cup of sugar. I told him to suck it up and enjoy it. The worst thing that will happen is that we'll have a sweet wine. I'm the one that thinks sweet wine is gross, not him. This one was made according to directions.

Blueberry Wine. We used 1 1/2 c sugar, 1/8 tsp yeast and Ocean Spray Blueberry Juice Cocktail.
This is the wine that I'm REALLY excited about. We added an extra half cup of sugar (the sign on the bottle is wrong) because the juice is tart to begin with and I didn't want a wine that was so dry that it tasted like sour blueberries. I think it still may come out a bit tart and we may have to try it after ten days and stop the fermentation process before it gets gross. This one was made according to directions.

Cherry Wine. We used 1 cup sugar, 1/8 tsp yeast and Juicy Juice 100% Cherry Juice.
This is another one that I'm excited about trying. It's on the sweeter side (like the Berry Burst) so I think it will be a little on the sweeter side. I just adore the cherry juice even if it's not alcoholic and I'm sure it will turn out great. This one was made according to directions.

Our first batch of hooch.
Apple, White Grape Peach and Grape wines
Berry Burst, Blueberry and Cherry wines

Tuesday, March 8, 2011

School Daze

In an attempt (a very vain attempt) to eliminate some clutter from my life, I started cleaning out my closet today. I made it though one box. This particular box just so happened to be a box that contained my entire high school life - notes that my BFF's had passed each other, old yearbooks and believe it or not, old report cards (that will be burned before Evel has the opportunity to see them and hold them over my head).

I looked through the stuff and thought back to how much I absolutely hated high school. There were very few things about it that I liked. I was just biding my time until I could graduate and become a grown up. If I knew then what I know now...

Surprisingly enough, when I think back to school, one of the only things that I liked were the teachers. And the teachers that really stick out in my memory were not the teachers that may have won the popularity vote. The teachers that I remember and that I am thankful that I had were the teachers that didn't just let kids slide by for the sake of passing them. They demanded more and they made me flex my brain for a change.

Mr. Kestner, for example. I remember him hovering over me in middle school keyboarding class, reminding me to keep my fingers on the home keys because it was far easier to type that way than to "hunt and peck." And I had his 9th grade Business Principles class with my little sister (three years my junior) because I wouldn't do my homework and instead of just passing me after the first two times I failed, he made me retake it until I finally did enough work to earn my grade.

And Mrs. Hagenbuch. I know there were a lot of kids that DID NOT like her. I know I got booted out of her classroom my fair share of times. But I also know that I can tell you the difference between Quartz and Calcite. And I can properly instruct my son on how to build a working model of our solar system out of paper mache, coat hangers and an old record player (okay, so it doesn't revolve QUITE like the real planets, but I got an A- on it).

Why do I look back and remember these teachers? Because they demanded that I give a damn about something other than myself. They held me accountable for not doing my best. I'm not saying the rest of my teachers were "bad" teachers, but these two are the teachers that I remember making me work for what I wanted and what I wanted was to get the hell out of school. When a lot of other teachers just seemed like they had given up and they didn't care about the students anymore (which is one of the reasons my children will never attend that school, along with the HORRIBLE administration turning a blind eye to the bullying that happens rampantly), these two teachers still had enough fight left in them to get mad. And that, they often did.

Why? Because their students didn't respect them (and I'm guilty of it, too). These kids talked back, threatened them and pushed them to their breaking points. You think you have a thankless job? Try being a teacher at my alma mater. What wasn't understood way back in 9th grade is that the only way you will get respect is if you give it. Yes, all of your teachers are making assumptions about you because you have never shown them otherwise. Only you can change someone's opinion about you.

I believe that is why our public school systems are failing our children. After you get treated badly for so long, you wind up broken. You lose your will to fight. And when teachers give up, the students eat them alive. And if they resist and try to demand respect and demand that kids do their best, the kids label them as a "mean" teacher and resolve to make their life a living hell. It's a vicious cycle. Maybe it's time to bring back the original "Board of Education" (a paddle for those that didn't get the pun) to get some kids in line.

And maybe it's time to cut the salaries of investment bankers that are ripping off their investors for millions and give some of that money to our teachers (rather than trying to bully through laws to take away their collective bargaining powers that will eventually screw them out of benefits and pay raises). Maybe then there would be some incentive for them to remain motivated on educating the future of our country.

Or maybe it's simpler than that. Maybe parents should teach their children respect. The reason that schools are no longer allowed to paddle your children is because the parents are the ones that complained and wanted to be the only people that disciplined their kids. Maybe your discipline isn't working. For your child to go to school and cuss out a teacher is unacceptable I myself am guilty of that also (not proud, but guilty) and if any of my children ever do it, they will not know what the word "ungrounded" means until they reach legal adulthood.

Maybe, just maybe, we need to look at the big picture before we point fingers at the teachers and blame them for failing our children. Just remember, every time you point a finger, you have 3 pointing right back at you.

Friday, February 18, 2011

For the Love of Dog!

My family and I are renters. I never really minded renting before because if something breaks, I don't have to freaking fix it. I make a phone call and it's taken care of for me. It's a perfect situation for someone as lazy as I can be sometimes. I was content renting for the rest of my life until I found this:
This is Sahara. She's a Yellow Lab Retriever Mix that is available for adoption at the Lycoming County SPCA in Williamsport, PA. (<----the link to her profile. Someone please go adopt her NOW). I saw this picture and my entire bubble of irresponsible living happiness came crashing down around me.

I found this picture on Sahara's profile on Petfinder.com a few weeks ago and I've been going back to check on it every few days. I've also been riding Big Daddy like a racehorse to call our landlord and threaten beg ask him if we can get a dog. Pretty, pretty freakin please!

This is the first time that I have lived anywhere longer than a few months without a dog and at first I was hugely somewhat relieved after living with the Terrible Twosome at the Mama's house. I didn't get out of bed and step in poop or have to worry about my underwear being eaten and it was a relief. But the longer I've gone without a furry companion, the more I miss it (not the poop and underwear eating, just the companionship).
Half of the Terrible Twosome, Mr. Ears. The other half is in the background, trying to keep her face hidden so as not to be recognized in a police line up.
 I miss coming home and no matter how crappy my day was, a dog will be there to just be my friend. They're a good source of exercise, they help lower stress levels and pet owners are clinically shown to have lower blood pressure and cholesterol than non-pet owners. It's a win/win situation!

Plus I think about the kids. Evel has ALWAYS had a dog around. I never heard him complain that he was bored and he never really asked to go to his friends houses because he had a source of entertainment at home (a very tiny, evil source of entertainment that seemed to love him and only him). Tink had a dog for the first half of her life. I wasn't around for that part but she still asks if Riley (a small, male Pitt Bull Terrier) is going to ever come to live with us again. And then we have Nutt. Nutt was terrified of the Terrible Twosome (maybe justifiably) the first time he saw them. I don't want him to grow up without the experiences that he would have if we were to have a dog and I don't want him to be nervous around them because he doesn't know how they will react.

But the thing that gets me the most about this dog is that it's a Yellow Lab. I am the worlds BIGGEST sucker for Yellow Labs because for 14 years, my family had Makita.

Makita came to us on a fluke after my Brittney Spaniel (Ginger) died a day after my 12th birthday. The neighbors had this misfit rebel of a dog that they were trying to get rid of so being the sucker that Poppi is (at least where his kids are concerned), we adopted Makita.

This dog was absolute hell on paws when we first got her. She wasn't housebroken (and really had no desire to be), you couldn't open the door without her bolting outside and terrorizing the neighborhood and she chewed almost everything in our home to bits (dining room chairs, the arms to the couch, the legs on the coffee table, one of every single shoe in the house, Poppi's game football that was signed by each of his pony football players the year that he coached them to the playoffs, just to name a few things). We tried muzzling her but if the muzzle was left within her reach while it was off, she would chew that up (we went through three of them). She was hopeless.

Except this dog had Poppi in her corner. He worked and worked with her until he transformed this wild animal into a cherished, docile family companion. Trid and Evel would sit on her back and pretend they were riding a motorcycle, using her ears as handle bars and she never once showed a tooth to them. If she wanted them off, she would just kind of roll over and dump them on the floor. She was by far one of the greatest dogs that I have ever known.

But all great things must come to an end. Makita passed away in 2007 from cancer. I was thankful that I was there with her at the end but I still bawl like a baby mist up when I think about it. And that's another reason that I want my kids to know the experience of sharing their lives a pet. It will teach them about unconditional love and it will eventually teach them about loss and how to cope with it. I always said that I would never have another dog after Makita, but Evel (and his big, brown eyes and knack for begging) prevailed and we got Mr. Ears. That's his little buddy, even if he doesn't see him that often.

And I know that someday the Mama will call and tell us that Mr. Ears has passed away and Evel will find his own way to cope. Just like I did with Makita and Ginger. Just like Poppi did with Rex (the greatest German Shepherd to ever live). And just like Trid did with Buster (the spunky little Border Collie that we adopted when my parents separated temporarily that became Trid's companion). It's the downfall to pet companionship but it's a small price to pay for all of those years of happiness. And all of the wet kisses and wagging tails that make having a doggy companion TOTALLY worth it.

And since I love showing off, here are some photos of the greatest furry friends that I've ever had the pleasure of knowing:
 
The lady of the hour, Makita (AKA Mosquito). As you can see, she's a party animal. Sadly, this is the only picture that I still have of her. It's in a frame on our mantle.

The Rex-meister. This guy was Poppi's buddy. We had him for 15 great years. Such a sweet dog.

Here is Peanut (and her floppy ear). I have no idea why the Mama decided to get this spawn of Satan after Buster died. And I have no idea why she agreed to let me get a second one so they could form a pack of evil.
Mr. Ears (and I'm sure you can tell where he got the name) came to us after Makita died. He was the runt of the neighbors litter and Evel slowly wore me down until we took his hypoglycemic, scrawny butt in.
 
Here's Buster. He was an odd dog that wagged his tail up and down, couldn't run in a straight line and "smiled" when he was nervous. Go figure he wound up being Trid's buddy.

Sadly, I no longer have any pictures of Ginger after all of my moves.

I would say that is it but I have 2 more pictures. They weren't dogs, but they're sure cool enough to qualify in my book.

Yoda (AKA Fat Ass Cat Ass). This guy's been around since 1998. He's 23 lbs. of mellow and sweet and love and everything that you wish when you buy a cat.
And this is Kitty Kruger. She is everything that is opposite of Yoda. She is the devil in cat form. We keep her around just for the funny photo opps that she gives us. We rescued her after her mother abandoned her and how does she thank us? Pulls everything out of my purse and uses it for a bed. And she would eat my cigarettes when I was a smoker. And she would claw my feet while I was sleeping. Man, maybe the photo opps aren't really worth it...